Introduction: The Secret Behind This Rustic Homemade Bread
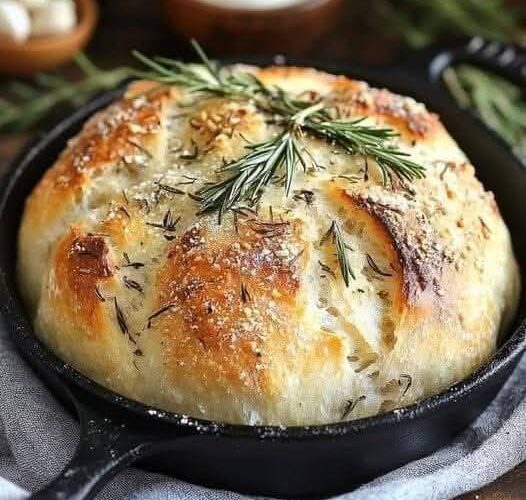
This garlic rosemary artisan bread is a classic example of how simplicity can produce bakery-level results at home. It is an easy no-knead bread recipe that relies on time instead of effort. There is no kneading required, yet the final loaf delivers a beautifully crisp golden crust, an open airy crumb, and a rich, savory aroma from garlic and fresh rosemary.
What makes this bread special is the long fermentation process. Instead of working the dough with hands or a mixer, the gluten structure develops slowly over 18–24 hours. This slow rise creates complex flavors that you simply cannot achieve in quick-rise breads. The result is a rustic, crusty artisan loaf that tastes like it came from a professional bakery.
This method is widely used in modern artisan baking and is inspired by traditional fermentation techniques. It has been popularized in home baking culture through professional baker adaptations such as those seen in classic no-knead bread approaches.
Why This No-Knead Bread Recipe Works So Well
The success of this overnight artisan bread recipe comes down to three essential principles:
1. Long Fermentation for Flavor Development
When flour, water, yeast, and salt are left together for many hours, enzymes naturally break down starches into sugars. This enhances the bread’s flavor, creating a slightly nutty, deep, and slightly tangy taste.
2. High Hydration Dough
This recipe uses a wet, sticky dough. High hydration allows steam to form during baking, which creates large air pockets inside the loaf. This is what gives you that signature “open crumb” structure found in artisan bread.
3. Minimal Handling
No kneading means the dough retains delicate air bubbles formed during fermentation. Less handling equals lighter texture and better oven spring.
Ingredients Breakdown (Simple Pantry Baking)
This recipe uses basic ingredients commonly found in most kitchens:
- 3 cups (360g) all-purpose flour – Forms the structure of the bread
- 3 cloves garlic, minced – Adds bold savory aroma and flavor
- 1 tablespoon finely chopped fresh rosemary – Provides earthy herbal notes
- 1 ¼ teaspoons kosher salt – Enhances flavor and controls fermentation
- ¾ teaspoon freshly ground black pepper – Adds mild heat and depth
- ½ teaspoon instant yeast – Slowly activates fermentation for long rise
- 1 ½ cups (350ml) water, room temperature – Hydrates dough for gluten development
- 2 tablespoons cornmeal – Prevents sticking and adds texture to crust base
Each ingredient plays a key role in building flavor and texture without complexity.
Step-by-Step Dough Formation (No Kneading Required)
The process begins with combining dry ingredients first. Flour, salt, pepper, yeast, garlic, and rosemary are mixed thoroughly to distribute flavors evenly.
Then water is added slowly. The dough should be stirred just until it forms a rough, sticky mass. It will look messy and uneven at this stage—this is completely normal. Unlike traditional bread recipes, you are not aiming for smooth dough.
Within 30–60 seconds of mixing, gluten strands begin forming naturally. This is the foundation of your bread’s structure.
Slow Fermentation: The 18–24 Hour Magic Stage
Once mixed, the dough is covered tightly and left at room temperature. During this long resting period:
- Yeast slowly produces carbon dioxide
- Gluten network strengthens naturally
- Flavors deepen and mature
- Dough expands and becomes bubbly
After 18–24 hours, the dough should look alive—soft, airy, and filled with small bubbles across the surface. It should have more than doubled in volume.
This is the defining step of any easy overnight bread recipe, transforming simple ingredients into artisan-quality dough.
Shaping the Dough for Baking
After fermentation, the dough is gently transferred onto a lightly floured surface. The key here is to handle it softly to preserve air bubbles.
Instead of heavy kneading, the dough is folded a few times and shaped into a loose round ball. This shaping helps create surface tension, which allows the bread to rise upward during baking instead of spreading flat.
A cast-iron skillet is ideal for baking because it retains heat evenly and creates a crispy crust.
The skillet is lightly coated and dusted with cornmeal to prevent sticking and enhance texture.
Final Proofing Stage: The Second Rise
After shaping, the dough rests again for about 2 hours. During this time:
- It becomes lighter and puffier
- Air pockets expand further
- Surface becomes slightly smooth and elastic
A simple way to check readiness is the “finger test.” When gently pressed, the dough should slowly spring back but still hold a slight indentation.
This stage is essential for achieving a bakery-style crusty artisan bread loaf.
Baking Process: Creating a Golden Crust
The oven is preheated to a high temperature of 450°F (230°C). High heat is essential for oven spring—the rapid expansion of dough in the first minutes of baking.
When placed inside the oven:
- Steam forms inside the dough
- Crust begins to set and crisp
- Interior expands into airy structure
- Garlic and rosemary release aroma
After 30–40 minutes, the bread develops a deep golden-brown crust. A hollow sound when tapped on the bottom confirms it is fully baked.
Cooling: The Most Overlooked Step
Once baked, the bread must be transferred to a cooling rack. It should rest for at least 1 hour before slicing.
This allows:
- Internal steam to escape
- Crumb structure to stabilize
- Texture to set properly
Cutting too early can make the bread gummy inside, so patience is important.
Air Fryer Version Overview (Modern Shortcut Method)
For a faster approach, the same dough concept can be adapted for an air fryer bread recipe. Instead of long fermentation, a shorter rise is used. The dough is shaped and air-fried at moderate heat until golden and crisp.
This method is ideal for those who want fresh bread in under an hour after mixing and shaping.
Expert Baking Tips for Best Results
- Use accurate measurement (360g flour recommended for consistency)
- Avoid adding extra flour during shaping (keeps crumb soft and airy)
- Let dough fully ferment for best flavor development
- Always preheat oven for strong crust formation
- Cool completely before slicing for best texture
Storage and Freshness Guide
To maintain freshness:
- Store in a paper bag for 2–3 days at room temperature
- Avoid airtight plastic containers (softens crust)
- Freeze sliced portions for long-term storage
Baking Science Summary
This bread is a perfect example of fermentation-based baking. Instead of mechanical kneading, time and yeast activity do all the structural work. This method produces:
- Better digestibility
- Enhanced flavor complexity
- Superior crust texture
- Artisan-style crumb structure
Source
Inspired by traditional no-knead artisan bread techniques popularized in professional baking, including widely recognized methods such as those associated with Jim Lahey and modern NYT-style slow fermentation bread baking approaches, adapted into an original instructional format.
Easy Garlic Rosemary No-Knead Bread
Ingredients
- 3 cups (360g) all-purpose flour
- 3 cloves garlic, minced
- 1 tablespoon finely chopped fresh rosemary
- 1 ¼ teaspoons kosher salt
- ¾ teaspoon freshly ground black pepper
- ½ teaspoon instant yeast
- 1 ½ cups (350ml) water, room temperature
- 2 tablespoons cornmeal
Method (Oven Baking)
- Mix flour, garlic, rosemary, salt, pepper, and yeast. Add water and stir into sticky dough.
- Cover and let rise 18–24 hours at room temperature.
- Shape dough into a ball and place in cornmeal-dusted skillet.
- Let rise 2 hours until puffy.
- Bake at 450°F (230°C) for 30–40 minutes until golden brown.
- Cool 1 hour before slicing.
Method (Air Fryer Option)
- Mix ingredients and let rise 1–2 hours.
- Shape dough and place in air fryer basket.
- Cook at 375°F (190°C) for 15–20 minutes.
- Cool 10–15 minutes before slicing.
If you want, I can also turn this into a blog post format (with SEO title, meta description, FAQs, and schema markup) for Google ranking.
