A Chocolate Lover’s Dream Dessert Made from Scratch
If you’ve ever relied on packaged brownie mixes for convenience, it’s time to experience something far more rewarding—homemade fudgy brownies made with simple pantry staples. These brownies are crafted to deliver a deep chocolate flavor, soft gooey center, and that irresistible crackly top that bakery-style brownies are famous for. Once you try this version, store-bought mixes will feel like a compromise rather than a shortcut.
What makes this recipe stand out is its balance between ease and indulgence. You don’t need fancy equipment or rare ingredients—just a few basics, a bowl, and a little mixing. Yet the result tastes like something straight out of a professional kitchen.
These brownies are perfect whether you’re baking for a family gathering, satisfying a late-night sweet craving, or preparing a dessert that impresses guests without stress. The texture is rich and dense, yet soft enough to melt in your mouth with every bite.
Why These Homemade Brownies Outperform Box Mixes
There are countless reasons why making brownies from scratch is worth it. First and foremost, you control the quality of ingredients. Packaged mixes often include preservatives and artificial flavoring, while this recipe relies on real butter, cocoa, and fresh eggs to create authentic taste.
Another major advantage is customization. When you bake from scratch, you can easily adjust sweetness levels, texture, and add-ins like nuts or extra chocolate. Want a slightly gooier center? Bake a little less. Prefer a firmer bite? Add an extra minute or two.
Additionally, homemade brownies deliver a freshly baked aroma and flavor that boxed versions simply cannot replicate. The difference is noticeable from the first bite—richer, more chocolatey, and deeply satisfying.
Texture & Flavor: What Makes These Brownies Exceptional
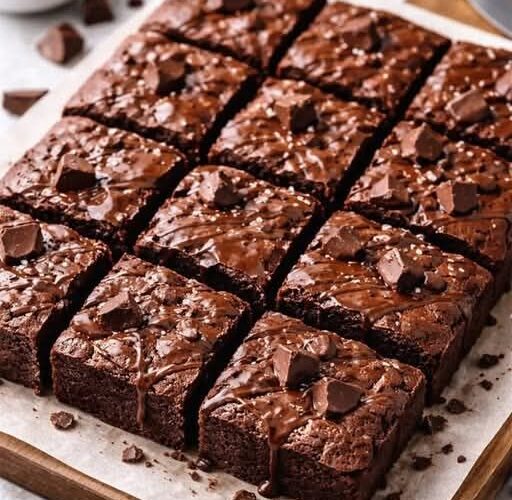
The hallmark of a perfect brownie lies in its texture. This recipe produces a fudgy interior with a slightly crisp, shiny top layer—a combination many bakers aim for but don’t always achieve.
- The butter and sugar mixture creates a smooth base that contributes to the shiny crust.
- The cocoa powder delivers an intense chocolate taste without needing melted chocolate bars.
- The addition of chocolate chips creates pockets of melted chocolate throughout, enhancing both texture and richness.
The end result is a brownie that is soft, dense, and packed with bold chocolate flavor, yet not overly sweet.
Smart Baking Tips for Perfect Results Every Time
To achieve bakery-quality brownies at home, a few small techniques can make a big difference:
1. Choose high-quality cocoa powder
The better the cocoa, the deeper and richer your brownies will taste. Premium cocoa powder enhances both color and flavor.
2. Avoid overmixing the batter
Once you add the dry ingredients, mix gently. Overmixing can lead to dense or tough brownies instead of soft and tender ones.
3. Slightly underbake for a gooey center
Brownies continue to cook as they cool. Removing them from the oven when the center is just set ensures a moist, fudgy texture.
4. Enhance flavor with a secret ingredient
A tiny pinch of espresso powder can intensify the chocolate flavor without making the brownies taste like coffee.
5. Add a finishing touch
Sprinkling a bit of sea salt on top right after baking creates a beautiful contrast between sweet and salty.
Creative Ways to Serve These Brownies
These brownies are incredibly versatile and can be served in many delicious ways:
- Classic Style: Enjoy them warm, straight from the pan.
- With Ice Cream: Pair with vanilla ice cream for a rich and comforting dessert.
- Party Presentation: Cut into small squares and drizzle with chocolate or caramel sauce.
- Layered Dessert: Use as a base for trifles or brownie sundaes.
- Extra Indulgent: Add whipped cream, nuts, or fruit toppings.
No matter how you serve them, these brownies are guaranteed to impress.
Storage & Shelf Life Tips
Keeping your brownies fresh is simple if stored correctly:
- Room Temperature: Store in an airtight container for up to 3 days.
- Refrigerator: Keeps fresh for about 5 days if sealed properly.
- Freezer-Friendly: Wrap individual pieces and freeze for up to 2 months. Thaw at room temperature before serving.
Proper storage helps maintain their soft texture and rich flavor.
Common Questions Answered
What makes homemade brownies better than boxed ones?
Fresh ingredients, no preservatives, and the ability to customize texture and flavor make homemade brownies far superior.
Can I make this recipe gluten-free?
Yes, simply substitute all-purpose flour with a gluten-free flour blend that includes binding agents like xanthan gum.
How do I check if brownies are done?
Insert a toothpick into the center—it should come out with a few moist crumbs, not wet batter.
Can I customize the recipe?
Absolutely. You can add nuts, swirl in peanut butter, mix white chocolate chips, or even incorporate cream cheese for a marbled effect.
Final Thoughts on This Chocolate Brownie Recipe
These homemade brownies prove that you don’t need complicated techniques to create something truly delicious. With their rich chocolate flavor, soft fudgy texture, and simple preparation, they are a perfect example of how homemade baking can be both easy and rewarding.
Once you make these, you’ll likely find yourself skipping boxed mixes entirely. They’re quick, reliable, and deliver consistent, mouthwatering results every time.
Part 2: Simple Step-by-Step Brownie Recipe
Ingredients
- 1 cup granulated sugar
- 1/2 cup melted unsalted butter
- 2 large eggs
- 1 teaspoon vanilla extract
- 1/3 cup unsweetened cocoa powder
- 1/2 cup all-purpose flour
- 1/4 teaspoon salt
- 1/4 teaspoon baking powder
- 1/2 cup chocolate chips
(Optional additions: pinch of espresso powder, chopped nuts, or sea salt topping)
Instructions
- Preheat your oven to 175°C (350°F) and line an 8×8-inch baking pan with parchment paper.
- In a bowl, mix melted butter and sugar until smooth and glossy.
- Add eggs and vanilla extract, and whisk until thick and creamy.
- Sift in cocoa powder, flour, salt, and baking powder. Mix gently until just combined.
- Fold in chocolate chips evenly.
- Pour the batter into the prepared pan and spread evenly.
- Bake for 20–25 minutes, until a toothpick inserted shows moist crumbs.
- Allow brownies to cool completely before slicing and serving.
