There’s something deeply comforting about the smell of freshly baked bread drifting through your kitchen. Among all classic baked goods, Amish-style white bread holds a special place because of its incredibly soft texture, slightly sweet taste, and simple pantry ingredients. This traditional homemade bread recipe has stood the test of time, not because it is complicated, but because it delivers consistent, delicious results with minimal effort.
In this complete guide, you’ll learn everything you need to know about making soft and fluffy white bread from scratch using a method inspired by traditional Amish baking. Whether you’re a beginner or an experienced home baker, this step-by-step breakdown will help you achieve bakery-quality bread at home.
Why This Homemade White Bread Recipe Works So Well
This recipe uses basic ingredients like all-purpose flour, sugar, yeast, oil, and salt to create a perfectly balanced loaf. The sugar not only adds a subtle sweetness but also feeds the yeast, helping the dough rise beautifully. The oil contributes to the soft crumb, making the bread tender and moist for days.
Unlike artisan breads that require complex techniques, this recipe is straightforward and beginner-friendly. It focuses on proper yeast activation, correct kneading, and allowing enough time for the dough to rise—three key factors that guarantee success.
Understanding the Ingredients (And Why They Matter)
Each ingredient in this recipe plays an important role:
- All-purpose flour forms the structure of the bread. It provides the gluten needed for elasticity and chew.
- Warm water activates the yeast. The temperature is crucial—too hot can kill yeast, too cold won’t activate it.
- Granulated sugar adds flavor and helps yeast fermentation.
- Active dry yeast is responsible for the bread’s rise and airy texture.
- Vegetable oil ensures a soft crumb and prevents dryness.
- Salt enhances flavor and controls yeast activity.
Optional additions (without changing the core recipe) can include a small amount of milk for extra softness or a light brushing of butter after baking for a richer finish.
Step-by-Step Breakdown for Perfect Bread Dough
1. Activating Yeast the Right Way
The foundation of any successful bread recipe begins with properly activated yeast. When you combine warm water and sugar, you create the perfect environment for yeast to thrive. After sprinkling yeast over the mixture, it should turn foamy within minutes. This foam indicates that the yeast is alive and active.
If the yeast doesn’t foam, it’s best to start over. Using inactive yeast will result in dense, flat bread.
2. Mixing the Dough for Ideal Texture
Once your yeast is ready, adding oil and salt balances the mixture. Gradually incorporating flour ensures the dough doesn’t become too stiff too quickly. The goal is a soft dough that is slightly tacky but not sticky.
Adding flour slowly also allows you to adjust based on humidity and room temperature, which can affect how much flour is actually needed.
3. Kneading: The Secret to Soft and Elastic Bread
Kneading develops gluten, which gives bread its structure. When done correctly, the dough becomes smooth, stretchy, and elastic.
You can knead by hand or use a stand mixer. The dough should pass the “windowpane test”—when stretched, it should form a thin membrane without tearing.
Proper kneading results in:
- Better rise
- Softer crumb
- Even texture
4. First Rise: Letting the Dough Expand
After kneading, the dough needs time to rise. Placing it in a lightly greased bowl prevents sticking while covering it keeps moisture in.
During this stage, yeast ferments sugars and produces gas, causing the dough to double in size. A warm, draft-free environment is ideal.
5. Shaping the Dough into Loaves
Punching down the dough releases excess gas and redistributes yeast. Dividing and shaping the dough ensures even baking.
Proper shaping creates tension on the surface, helping the bread rise upward instead of spreading out.
6. Second Rise: Building Volume
The second rise happens after the dough is placed in loaf pans. This stage is shorter but equally important. The dough should rise slightly above the edge of the pan for a well-rounded loaf.
Skipping or rushing this step can result in dense bread.
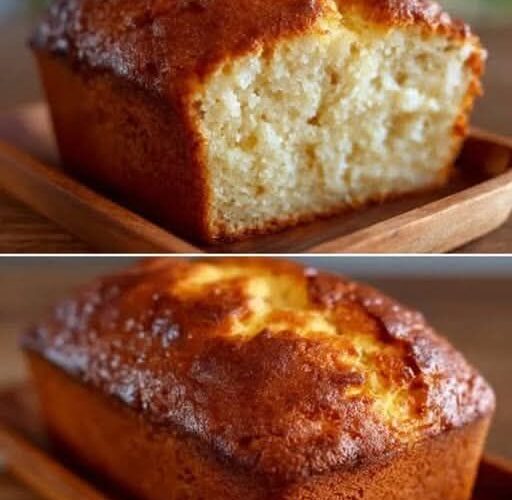
7. Baking to Golden Perfection
Baking transforms the dough into a beautifully golden loaf. The heat activates the final rise (oven spring) and sets the structure.
A perfectly baked loaf will:
- Have a golden-brown crust
- Sound hollow when tapped
- Release easily from the pan
8. Cooling: The Most Overlooked Step
Cooling allows the bread’s internal structure to set. Cutting too early can make the bread gummy. Letting it cool completely ensures clean slices and the best texture.
Pro Tips for Bakery-Quality Results
- Always measure flour correctly—too much flour leads to dense bread.
- Use fresh yeast for reliable rising.
- Keep dough slightly soft rather than stiff.
- Avoid overbaking to maintain moisture.
- Brush with butter after baking for extra softness.
Common Mistakes to Avoid
- Using water that is too hot or too cold
- Adding too much flour too quickly
- Skipping kneading or rushing it
- Not allowing enough rise time
- Cutting bread while still hot
Serving Ideas for Homemade White Bread
This versatile bread can be used in many ways:
- Toast with butter or jam
- Sandwiches and burgers
- French toast or bread pudding
- Garlic bread or croutons
Its mild sweetness makes it suitable for both savory and sweet dishes.
Storage and Shelf Life
To keep your bread fresh:
- Store in an airtight container at room temperature for up to 4 days
- Avoid refrigeration as it can dry out the bread
- Freeze slices or whole loaves for up to 2 months
Why Homemade Bread is Worth It
Making bread at home is not just about the final product—it’s about the process. From mixing and kneading to watching the dough rise, every step is rewarding. This Amish-inspired white bread recipe brings simplicity and tradition together, making it perfect for everyday baking.
Once you try it, store-bought bread may never feel the same again.
Part 2: Simple Amish-Style White Bread Recipe (Quick Version)
Ingredients
- 6 to 7 cups all-purpose flour
- 2 cups warm water (110°F to 115°F)
- 1/2 cup granulated sugar
- 1 1/2 tablespoons active dry yeast
- 1/4 cup vegetable oil
- 2 teaspoons salt
Instructions
Step 1: Prepare Yeast
Mix warm water and sugar in a large bowl. Add yeast and let it sit for 5–10 minutes until foamy.
Step 2: Make Dough
Add oil and salt. Slowly mix in flour until a soft dough forms.
Step 3: Knead Dough
Knead for 6–8 minutes until smooth and elastic.
Step 4: First Rise
Place in greased bowl, cover, and let rise for 1–1.5 hours until doubled.
Step 5: Shape Loaves
Punch down dough, divide into two, and shape into loaves.
Step 6: Second Rise
Place in greased loaf pans. Let rise 30–45 minutes until slightly above pan edge.
Step 7: Bake
Bake at 350°F (175°C) for 25–30 minutes until golden brown.
Step 8: Cool & Serve
Cool completely before slicing. Serve with butter or spreads.
Helpful Tips
- Use properly warmed water for yeast activation
- Let dough fully rise for best texture
- Store in airtight container for freshness
