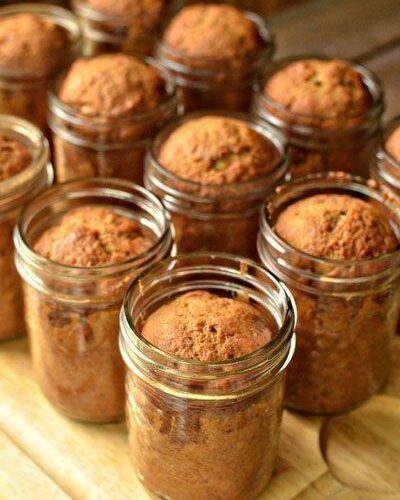
There’s something timeless and comforting about banana bread. Its soft texture, naturally sweet flavor, and warm aroma make it one of the most beloved homemade baked goods around the world. Now imagine transforming that classic loaf into beautifully portioned banana bread jars—perfect for gifting, storing, or enjoying as a personal treat anytime. This banana bread in a jar recipe brings together tradition, convenience, and creativity in one delightful baking experience.
Unlike standard banana bread baked in a loaf pan, this version is prepared in individual canning jars. The result? A moist, flavorful dessert that not only looks charming but also stays fresh longer when sealed properly. Whether you’re preparing edible gifts, planning a picnic, or simply want a practical way to store homemade baked goods, this recipe offers a smart and delicious solution.
Why Banana Bread in a Jar Is So Popular
In recent years, jar baking recipes have gained popularity due to their versatility and presentation. Banana bread jars stand out because they combine the rich taste of classic banana bread with the practicality of portion control and extended shelf life.
These mini loaves are:
- Easy to store and transport
- Ideal for homemade gifts
- Perfectly portioned for individual servings
- Visually appealing and creative
They also align with trending baking keywords like easy homemade banana bread, moist banana bread recipe, giftable baked goods, and make-ahead desserts.
Understanding the Ingredients and Their Role
To achieve the perfect texture and flavor, each ingredient in this recipe plays an important role.
Butter (Softened):
Butter adds richness and moisture to the bread. When creamed with sugar, it creates a light and fluffy base that helps the bread rise properly.
White Sugar:
Sugar not only sweetens the bread but also contributes to its soft texture. It helps retain moisture, ensuring the bread stays tender even after baking.
Eggs:
Eggs act as a binding agent, holding all the ingredients together. They also add structure and contribute to the bread’s soft crumb.
Ripe Bananas:
The star of the recipe, ripe bananas provide natural sweetness and moisture. The riper the bananas, the better the flavor. Overripe bananas with brown spots are ideal.
Water:
Water helps loosen the batter and ensures the bread remains soft and moist during baking.
All-Purpose Flour:
Flour forms the base structure of the bread. It provides stability while still allowing the bread to remain soft.
Baking Soda & Baking Powder:
These leavening agents help the bread rise and create a light texture. The combination ensures a balanced lift.
Salt:
Salt enhances all the flavors and balances the sweetness.
Cinnamon & Cloves:
These warm spices add depth and aroma. Cinnamon is essential for that classic banana bread flavor, while cloves add a subtle, optional richness.
Chopped Nuts:
Pecans or walnuts add crunch and contrast to the soft bread. They also bring a slightly nutty flavor that complements the bananas.
The Secret to Moist Banana Bread
One of the most important goals in banana bread baking is achieving the perfect moist texture. This recipe ensures that by combining high-moisture ingredients like bananas, butter, and eggs.
Tips for extra moist bread:
- Use very ripe bananas
- Avoid overmixing the batter
- Measure flour accurately
- Bake at the correct temperature
Overbaking is one of the most common mistakes, so always check doneness with a toothpick.
Why Bake in Jars Instead of a Loaf Pan?
Baking in jars offers several unique advantages:
1. Portion Control:
Each jar contains a single serving, making it easy to manage portions.
2. Extended Freshness:
When sealed properly while hot, the jars create a vacuum seal that helps preserve the bread.
3. Perfect for Gifting:
These jars can be decorated with ribbons or labels, making them ideal homemade gifts.
4. Easy Storage:
They take up less space and are easy to stack or carry.
How the Sealing Process Works
One of the most interesting aspects of this recipe is the sealing process. After baking, the jars are immediately closed with lids while still hot. As they cool, a vacuum seal forms, which helps preserve the bread.
You may hear a “ping” sound as the jars seal—this is a good sign that the process worked correctly.
Important tips:
- Always use clean, dry jars
- Do not overfill the jars
- Seal immediately after removing from the oven
If a jar doesn’t seal properly, it should be refrigerated and consumed first.
Flavor Variations and Creative Twists
This recipe is highly adaptable, allowing you to experiment with different flavors while keeping the base ingredients the same.
Some ideas include:
- Adding chocolate chips for a sweeter version
- Replacing nuts with dried fruits
- Mixing in shredded coconut for texture
- Adding a streusel topping before baking
These variations can make each batch unique and exciting.
Serving Suggestions
Banana bread in jars can be enjoyed in many ways:
- Eat directly from the jar for convenience
- Slice and serve with butter or cream cheese
- Pair with coffee or tea for a comforting snack
- Warm slightly before serving for a fresh-baked feel
Storage and Shelf Life
Properly sealed jars can last up to 1–2 weeks at room temperature. Once opened, the bread should be refrigerated and consumed within a few days.
For longer storage, you can also freeze the jars (without lids) and reheat when needed.
Common Mistakes to Avoid
- Overfilling jars, causing overflow
- Not greasing jars properly
- Overmixing the batter, leading to dense bread
- Skipping the sealing step
Avoiding these mistakes ensures perfect results every time.
Why You’ll Love This Recipe
This banana bread jar recipe combines convenience, flavor, and creativity. It’s perfect for beginners and experienced bakers alike. The individual portions make it practical, while the rich banana flavor makes it irresistible.
Whether you’re baking for yourself, your family, or as a thoughtful homemade gift, this recipe delivers consistent, delicious results.
Part 2: Simple Banana Bread in a Jar Recipe
Ingredients
- ⅔ cup (150g) softened butter
- 2⅔ cups (530g) white sugar
- 4 large eggs
- 2 cups mashed ripe bananas (about 4–5 bananas)
- ⅔ cup water
- 3⅓ cups (415g) all-purpose flour
- 2 teaspoons baking soda
- ½ teaspoon baking powder
- 1½ teaspoons salt
- 1 teaspoon ground cinnamon
- 1 teaspoon ground cloves (optional)
- ⅔ cup chopped pecans or walnuts
- 12 clean 250 ml (1-cup) canning jars
Instructions
Step 1: Preheat Oven
Set oven to 325°F (165°C). Grease the inside of each jar thoroughly.
Step 2: Cream Butter and Sugar
In a large bowl, beat butter and sugar until light and fluffy.
Step 3: Mix Wet Ingredients
In another bowl, whisk mashed bananas, eggs, and water. Add this mixture to the butter mixture and blend well.
Step 4: Combine Dry Ingredients
In a separate bowl, mix flour, baking soda, baking powder, salt, cinnamon, and cloves.
Step 5: Make Batter
Gradually add dry ingredients to the wet mixture. Stir gently until just combined.
Step 6: Add Nuts
Fold in chopped nuts evenly.
Step 7: Fill Jars
Spoon batter into jars, filling each about halfway. Clean jar rims.
Step 8: Bake
Place jars on oven rack and bake for 40–45 minutes until fully cooked.
Step 9: Seal Jars
Remove from oven and immediately seal with lids. Allow to cool until sealed.
Step 10: Store and Serve
Store sealed jars at room temperature for up to 2 weeks. Refrigerate after opening.
